How to Create a New Dispatch & Add Pallets
Managing dispatches efficiently is key to running a smooth farm operation, ensuring that your products are delivered on time and in good condition. In Pack Shed Pro, creating a dispatch and adding pallets to it is a straightforward process. This guide will walk you through the steps to create a new dispatch and associate pallets of fruit with it.
Step 1: Log into Pack Shed Pro
Start by logging into your Pack Shed Pro account. Go to the login page, enter your username and password, and click Login.
- Tip: If you’re new to the software, make sure your farm profile and inventory (including pallets of fruit) are set up before creating a dispatch.
Step 2: Navigate to the “Dispatch” Section
Once you’re logged in, navigate to the Dispatch section of the software.
- Tip: The “Dispatch” section is where all shipping and delivery-related tasks are handled, including the management of orders, shipments, and pallets.
Click on Dispatch to enter the dispatch management area.
Step 3: Create a New Dispatch
In the Dispatch section, you will see an option New Dispatch. Click on this button to begin the process of creating a new dispatch.
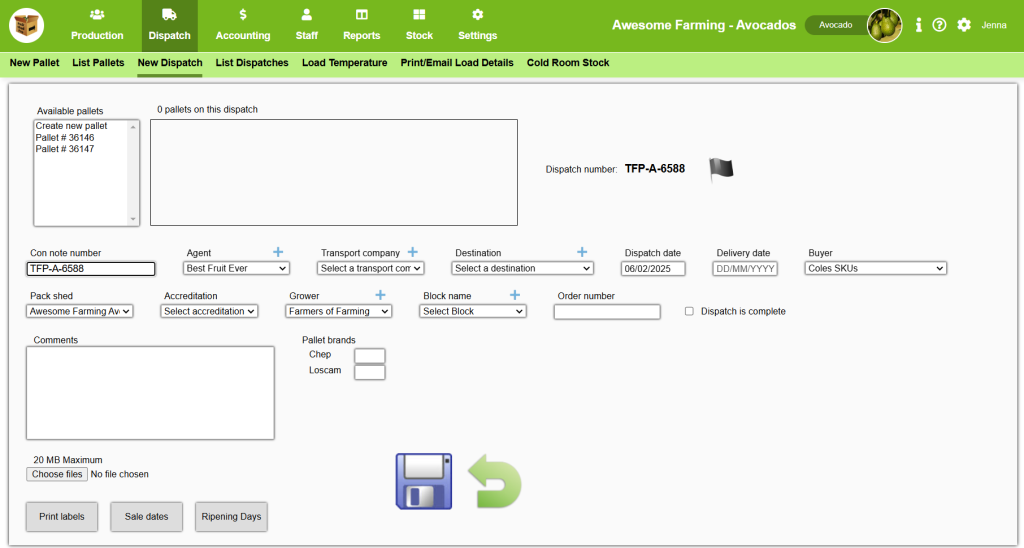
Required Information:
You will need to enter the following details:
- Con Note Number: This is to identify the dispatch in your records.
- Dispatch Date & Delivery Date: Select the date when the dispatch is scheduled to leave the farm and reach its destination.
- Destination: Enter the location where the dispatch is headed. This might be a specific warehouse, distribution centre, or direct customer. You can also add the Buyer.
- Carrier Information: Include the details of the transport company, and Agent as well.
- You can also add the pack shed, grower, accreditation details, block name, order number, and more information in the available sections as well as the Comments section, and upload any relevant documents.
Step 4: Add Pallets to the Dispatch
Now that your dispatch is created, it’s time to add the relevant pallets. Adding pallets to a dispatch ensures that the right products are delivered to the correct location.
How to Add Pallets:
- Click to Add Pallets: There will be list of available pallets at the top of the page when creating a new dispatch. Click on this option to start adding pallets to your dispatch.
- Select Pallets: You’ll be shown a list of available pallets from your inventory. These pallets may include recently packed fruit, and are labelled by their pallet number.
- Add Pallets to Dispatch: Once you’ve located the pallets you want to add, simply select them and click the Add to Dispatch button.
Customizing Pallet Allocation:
You can also specify the quantity or make adjustments to the selected pallets if needed. For example, if you have a mixed pallet, you can ensure that the correct quantities of each fruit type are included in the dispatch.
- Tip: If the dispatch involves mixed fruit varieties, verify the total number of boxes or weight of each type of fruit to ensure accurate delivery.
Step 5: Review and Finalize the Dispatch
After adding the pallets, it’s important to review the dispatch details to make sure everything is correct.
Review the Following:
- Pallet Details: Confirm that all the pallets added match the type, quantity, and weight of the products being dispatched.
- Delivery Information: Double-check the delivery address, carrier details, and delivery date.
- Pallet Tracking: Make sure the pallets are properly linked to the dispatch and are listed under the Dispatch section.
Once everything is confirmed, you can Save the dispatch.
Step 6: Print or Generate Dispatch Documents
Once the dispatch is created and finalized, you might need to generate shipping documents. This could include:
- Packing Slip: A detailed list of all the pallets and their contents.
- Shipping Labels: Labels with barcode or QR code for each pallet.
- Invoice or Delivery Note: Any necessary financial documents for billing or confirmation of delivery.
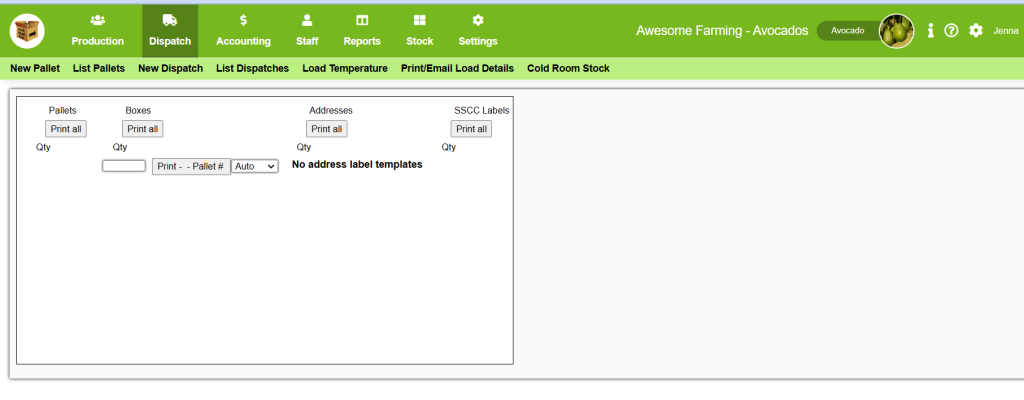
Pack Shed Pro typically offers options to Print or Download these documents directly from the dispatch page.
- Tip: Make sure the shipping labels are printed correctly and affixed to the corresponding pallets for easy identification during transportation.
You can also check Sale Dates and Ripening Days on this page prior to exiting.
Conclusion
Creating a new dispatch and adding pallets to it in Pack Shed Pro is a simple yet crucial step in managing your farm’s shipments. By following these steps, you can ensure that your pallets are dispatched accurately, on time, and with all the necessary details. This will help maintain a smooth workflow and keep your customers satisfied with timely deliveries. Happy dispatching!